Showing posts with label basket panel. Show all posts

Friday, May 11, 2012

Stitching the Design and Removing the Water Soluble Film

The last blog repeat, this time from November 20, 2011.  Wanted to follow up right away and not make you click back links to read.  Just ignore if you are not interested in re-reading a past post.
IMG_5418
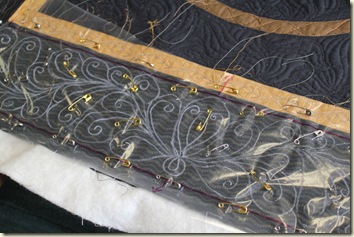
I used a shiny gold colored thread and followed the lines on the water soluble film as best I could.  I did find it made the edge of the quilt a little stiff so I wobbled every once in a while.  Of course I might have wobbled anyway as I am not an expert machine quilter but why not use that as an excuse – ha, ha!

Since the water soluble film was quite heavy it didn’t want to tear off the stitches.  I didn’t want to wet the entire film to remove it so came up with an alternate method.  I first used a regular paint brush and a cup of water and just painted the lines of stitching.  The plastic could be lifted off the un-stitched areas slick as could be.  As I was using the paint brush I remembered I bought a Yasutomo Niji Waterbrush at Paducah that I had never used with the water color pencils also unused.    (Must get them out and actually use them soon.)  I dug the brush out of my drawer of miscellaneous quilt stuff and put it to work.  It was nice not to have to dip my brush into water all the time, just had to give this waterbrush a little squeeze to get more water into the bristles.IMG_5420
To fill it you unscrew the top and squeeze the barrel while holding it under water.  As the brush gets dry the soft plastic barrel is squeezed to re-saturate the brush.  I just painted the stitching lines and that was enough to melt the plastic so the rest could be removed with the small hemostats I used to grab the pieces to remove them.
IMG_5419


IMG_5421
Of course there are tiny bits left but when I wash this quilt the rest should all dissolve and wash away.  This removal took a little time but really wasn’t too bad, especially when I did it while watching TV.  I had a little mess of tiny pieces to vacuum up around my chair when I was finished though.

After getting all the plastic film off the quilt borders I examined my stitching.  The parts that were really squiggly and wiggly I removed and re-quilted them.  I traced the original stitching lines with that same white chubby crayon that comes off when ironed to mark where the stitching would be re-stitched.  IMG_5471
The next step I will take when all the boo-boos are fixed is to echo quilt around my feathered designs.  I will be using black thread so it doesn’t detract from my feathers and make the feathers stand out more.  I am thinking this may take a while and right now I don’t know how many rows I will be doing until I actually start stitching it.  Don’t look for a report on that stitching as I will probably keep the rest a secret until the unveiling in May 2012.  I know, it is unfair to get teased about this quilt and not get to see it and if I knew for sure none of quilt guild members read this blog I would be more open about showing everything right now.

This has been a fun quilt to work on so far.  Have been thinking about what I want to do next but right now have no idea.  I could start working on the program I am going to give for my quilt guild in January – Tips and Tricks for Making Bags/Purses.  I have lots of ideas and things I want to show and tell about but need to get it all organized and probably should start soon.  I want to make samples, compile lists of resources for patterns, and relay other tips and tricks I have picked up when making bags.  I like doing programs as I always learn so much so volunteer to give programs on something I want to know more about.  Our guild has only about 30 members and have a variety of programs but can't afford to bring in big name quilters so have a lot of member given programs.  They cover a big variety of subjects and everyone appreciates the work put in to prepare.  The more I type about this program the more I am convinced I had better start as time will go quickly the next couple of months.

 Until Later,
Lynn

Thursday, May 10, 2012

Transferring the Quilting Lines

Here is another repeat blog post from November 14, 2011  where I shared the border marking techniques and tools I used.


Yesterday I showed you the design I am going to use on the border quilting and today I am going to share how I got that design onto the black basted quilt border.  I thought about making a stencil but didn’t want the work of cutting all those channels so came up with another idea.IMG_5412I cut a piece of water soluble plastic like material and laid it over the quilting design I had drawn.  I don’t know what the brand name of this plastic film is but have had it a long time and think I remember buying it in the machine embroidery section of the fabric store.  It is heavier than Solvy, another product that looks like clear plastic and dissolves in water.chubbyweblargeI marked the design with the Chubby Crayon by Miracle Chalk.  It feels like a crayon, marks white marks on fabric or this plastic and the website says has chalk in it too that will disappear with heat from an iron.  I don’t think I need it to disappear since I am marking on the plastic but didn’t want to use a regular crayon in case some marks might transfer over to the black fabric.
I taped the plastic stuff (sure wish I could remember what it is called) to my newsprint design and traced the design with the Chubby Crayon.  I drew the outside registration marks with a pink permanent marker (follow the arrow to see the line) to make it easier to line up straight on the border.  You can see the marks after I put a purple folder under the plastic.

I used safety pins to attach the plastic to the border, centering it as I pinned.  I did remove the hand basting on that black border as I wouldn’t be able to get it out before crossing over it and stitching it down.
IMG_5405
I did cut the corner design off and positioned it exactly on the corner of the border as it was just a little off and I can extend the quilting lines to get it all connected I hope.  IMG_5408
I have all 4 sides pinned and ready to quilt and am anxious to find out if my “great idea” will turn out like I hope it will.  I do have it pinned down pretty flat so hope I don’t get any tucks or pleats.  I will let you know how the quilting goes on this border right away and won’t make you wait until the big reveal in May.


Until Later,
Lynn

Wednesday, May 9, 2012

Quilting Designs for the Borders

This is a re-run of the November 12, 2011 blog post to refresh you as to how I planned the outside border quilting designs………
I know I should have figured out what I wanted to quilt in the borders of my Guild Panel Challenge before I basted and quilted the center but I was just too impatient and figured I would deal with it later.  IMG_4860I got the middle quilted and then came to a complete stop when I didn’t know what to quilt in this approximately 6” wide border.  (I worked really hard to get those wiggly stripes in the black fabric to match on the corners too.)  I wasn’t sure how I would even mark the designs I did come up with but I decided I wanted a curvy border so set about getting my curves figured out and drawn on to long pieces matching the border lengths.  I keep a end roll of newsprint I got from the local newspaper office for free to draw my designs on.  Check it out to see if your newspaper office has these end rolls for free or little charge. You can cut off large pieces of paper to use to draw long border designs, quilting designs, applique designs or for kids to draw and color on. IMG_5400I started out drawing the number of sections each border would have and drew a gentle curve to be the center spine of my design.  I had several copies of each of these borders to sketch ideas on in pencil with the spine drawn in a dark black marker.  As you can see I was thinking of curl back parts on the design.  I had several design ideas and tweaked and tweaked the design until I came up with my final design.
Here are the final border designs, drawn out with black and orange marker.  As you can see I abandoned the back curls and I only drew only half the border as the other half is just the same only reversed. IMG_5412I do like the design and tomorrow I will show and tell you how I got this design transferred to the black border of the basted quilt so stay tuned.
 
Until Later,
Lynn

Tuesday, May 8, 2012

Basket Panel Background Quilting

IMG_4972I chose black thread to do the background quilting on the basket panel quilt.  I used a design similar to McTavishing, developed by Karen McTavish, to give it texture.  I used Isacord black thread in the top and light gold colored Bottom Line in the bobbin to match my backing.  I wanted texture without adding a colored thread so chose the black color for my free hand McTavishing.  McTavishing is also very forgiving quilting design as well.

My machine does not have any problem quilting with this combination of threads.  I was surprised that I didn’t have to do a little adjustment on the tension to keep black dots of thread from showing on the back and gold colored dots showing on the top but will take the gift of perfect tension anytime.IMG_4982The little 1” gold border was first quilted with end to end leaves with a medium tan polyester embroidery thread in the top and the same gold Bottom Line thread in the bottom.  I marked the outside of the leaf shapes with one of those mechanical chalk pencils by Fons and Porter using white chalk lead.  It brushes off easily so use it a lot, plus it makes a skinny line.IMG_7839Since I heavily quilted the rest of the quilt I felt this narrow border needed more quilting too so added another line of quilting with gold thread to match the fabric.  As you can see I echo quilted close to the leaf and just made circle loops to fill in the space.  It flattens the border without mudding the leaf design too much.

This quilt has been so much fun to quilt.  Not sure why but maybe because I did not feel rushed to finish it.  Savoring the process has it’s perks I guess.

Lynn

Saturday, April 21, 2012

Quilting the Basket of Flowers

IMG_4936Even though this is a pre-printed panel I wanted the applique looking motifs to stand out so outline stitched each one plus quilted some of the details matching the thread to the motif.  I chose to use Bottom Line by Superior Threads in a neutral color to blend into the backing fabric print.IMG_4937The basket has dotted lines to indicate the weave so decided to just quilt on the lines.  I used my walking foot and quilted line after line….then I really looked at what I had done.  Do you see the problem? The fabric was wrinkling in diagonal lines.  I tried quilting the lines from opposite directions and quilting them the same direction and nothing helped.  I had to sit and think what to do since I didn’t want the basket all goofy looking.IMG_4938I decided to try another quilting plan and ripped out all the lines I had already stitched and proceeded to quilt it in a zig zag motion following the lines.  I took the walking foot off the machine and put on the BSR (Bernina Stitch Regulator foot) so I would not have to stop and turn every inch.  I admit it wasn’t easy to stay on the lines doing it free hand, and there are places where it got a little wiggly but I didn’t get any of those nasty puckers.IMG_4940

IMG_4971Now doesn’t that look better?

Background quilting is next so stay tuned.
Lynn

Friday, April 20, 2012

Panel Challenge Borders

IMG_4861I added simple mitered borders to the basket panel.  The gold/yellow print border is 1” finished and the black print was cut 5".   I usually don’t bother with mitering corners but with the black print being a stripe I thought it would add a little more interest to the corners.IMG_4860
This was the only corner where the black stripe print came together perfectly.  The others were not quite so flowing but look OK so I didn’t change the plan.

Lynn

Wednesday, April 18, 2012

Back to the Challenge

IMG_4143The bobbin stitching is finished and all the threads have been pulled to the back and tied so now I need to get rid of the excess stabilizer on the back.  Remember I chose to use a water soluble stabilizer but I didn’t want to remove it all behind the flowers, stems, leaves and basket handle where I did the bobbin stitching.  I want that little extra stabilizer left inside the quilt to help hold the stitching and to add a little more bulk to the back of the stitched areas.IMG_4116Tools I used for the job were a flat artists brush, a cup of water, seam ripper and tweezers.  I painted water around the outside of each flower, leaf, etc.  I pressed my finger down on the flower petal, etc. to keep it from from getting torn loose. I then used the tweezers and seam ripper to separate the background waste and remove it.  Sometimes I would scratch along the line with the point of the seam ripper to get in tight places.  You could use any pointy tool where I used the seam ripper to help define the outside of the shapes.   This technique worked like a charm!
  IMG_4117IMG_4119IMG_4122
Here is the back with all the excess stabilizer removed.  It really didn’t take all that long to remove then I let it dry so the remaining stabilizer would not crumble or get removed with handling.IMG_4124Next up is squaring up the panel and adding borders.  So far this has been a fun project to work on and will use these techniques again.

Until Later,
Lynn

Wednesday, April 4, 2012

Basket Panel–Bobbin Work

The topic of this blog post is on doing bobbin work on the flowers, leaves, stems and basket handle.  First I am posting the after photo of the bobbin work so you can see what I did to the panel.  Just click on the photo to get a larger version you can see the detail.  (Sorry this photo is a little odd as the fabric was laying on the floor so the photo was taken at an angle.)  Keep reading if you want to know how I did the bobbin work.
IMG_4126-2To start, I pinned the water soluble stabilizer I had on hand to the back of the flower area then used the sewing machine to baste around the edge and in a grid across it to hold it in place.  I would tell you what brand it was but don’t know as the label was gone.  I do think any of the paper like water soluble stabilizers will work though.IMG_3979
Next I needed to get the position and shape of each flower, leaf, etc. transferred to this white interfacing.  I didn’t want to mess with getting out my light box so just taped the sandwich to the window. IMG_3982
I used the FriXion marker to trace the outlines on the white interfacing and any other marks I wanted to stitch with bobbin work.  This marker made a bright enough mark to see and heat will make it disappear.  I have heard that the marks from these markers have been known to come back if the piece gets cold but since this will be then inside of my quilt it just won’t matter.IMG_3984
I wound bobbins with the 6 strand DMC embroidery floss for my bobbin work.  Not a lot of floss will fit on each bobbin since it was so thick so had to fill bobbins pretty often.  The top thread I chose matched the floss I was using for each part….green top thread with green floss, blue top thread with blue floss, etc.   Matching the thread makes it invisible if it pops to the top.

I used a free motion foot on top and the second bobbin case I own for this machine in the bottom.  I purchased the second bobbin case so I could adjust the tension on it when ever I wanted for heavier threads and keep the other bobbin case for regular threads.  The tension screw had to be loosened quite a bit for this thick thread.  I do have a tip for anyone doing adjustments on the screw on their bobbin cases.  Put the bobbin case in a small plastic bag and do the adjustments while it is in the bag.  From personal experience if that itty bitty screw comes out and drops or flies away you will have a dickens of a time finding it.  The plastic bag will at least contain it.  Another tip – if you do happen to loose it on the floor take all the pins off your magnetic pin cushion and pat the floor in systematic rows and you might be lucky enough to find it…I found mine that way once.

I started stitching following the lines on the stabilizer pulling the floss to the backside which is actually the side that is up when you are stitching bobbin work.  Confusing I know, but remember the floss will be stitched to the front of the panel so the top thread is stitching on the back.  It is hard to stitch and not know what it will look like until you turn it over but that is what you have to do.  Try to make even sized stitches so the bobbin stitches will look nice when you are done…not an easy task but that is the goal. At the end of a line of stitching leave long tails on both threads and pull or using a large eyed needle bring the floss tail to the back.  I tied the tails together to secure them on the back then trimmed the tails.
IMG_3994 IMG_3991
IMG_3989
IMG_3997IMG_3998
I really like the texture this adds to the panel.  I have never done bobbin work on anything but a sample when I took a class one time.  I think the hardest part was keeping the stitches fairly even and not to stop moving my hands while the needle was still moving.  That is a sure way to make a lumpy spot in the bobbin stitching and of course those places had to be all ripped out and done over.  I tried to start and stop in the same spot so no one would be able to spot the starts and stops where lines had to be joined.  I still have a lot to learn to make my bobbin stitching perfect but I like my first real attempt.
I want to use this technique again as it was fun and sure adds a lot to the printed flowers, etc. on this panel.

Until Later,
Lynn

LinkWithin

Related Posts Plugin for WordPress, Blogger...