Showing posts with label Frieda Anderson. Show all posts

Saturday, October 16, 2010

Small Autumn Mums

I finished my Frieda Anderson quilt...Small Autumn Mums.  Notice the name is different than what I have been referring to it by?  I have been calling it Little Autumn Mums but this afternoon I looked up the instructions she handed out and see that it is "Small" not "Little" like I thought.

The binding is fused fabric cut with the deckle rotary blade and fused on. Two opposite sides are fused first then the last two. The ends of the last two are trimmed and folded to the back then the backside of that last strip fused down. The final touch is the top stitching around the outside edge.

I did add a sleeve to the back and that is the only hand stitching on the entire quilt. With all the machine quilting I did on it the quilt was not quick to make but did stretch me out of my comfort zone. I had never just free hand cut strips and fused the backing of a quilt together so that was a new technique for me. I am not sure I will "free" cut but do like the idea of fusing as I am designing so may try that again.

I don't have a clue as what I will work on next. Maybe I will have to get out one of my UFOs to finish.
Fused Binding - front
Fused Binding - back
Lynn

Thursday, October 14, 2010

Little Autumn Mums

Couldn't get the binding done yesterday so decided to show the quilt with the shading done with out it's binding.  The shading I did is pretty subtle but it makes the designs show and the purple flower is a little better than before.   I love Frieda Anderson's hand dyed fabrics that we got as part of the class fee for this wallhanging.  The shadings of one color into another are just beautiful.

Happy Quilting,
Lynn

Wednesday, October 13, 2010

Shaded Flowers

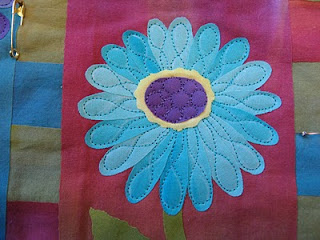
I used the Prismacolor colored pencils on the three flowers too. I figured if I used them on the purple one I had better use them on the other two a little two or they might look funny. Here is what they look like now and the way they looked before. New photos with the shading done are on the right.  The pink and teal don't have much change but in person they look a little more shaded on the tips. The lighting was a little different on the photos too so it really isn't a very good comparison.  I used a light pencil and shaded a little to the inside of the petals too.  As you can see the purple one has the biggest change.  Not sure this is the final look but sure is better than the way they were at first.


Now on to the binding.
Happy Quilting,
Lynn

Tuesday, October 12, 2010

Uh, Oh...Designs Don't Show!

What I was afraid of has come true...the vine and leaf designs do not show with the busy bubble quilting surrounding them. The threads are too close to the same value and the patterns I used are busy in the background and the stem and leaves so what I get is mush!

I decided to go over all the quilting lines with a heavier green thread and hoped that would help...not too much difference with it either.  The photo on the right is after I quilted with the new green thread...see it still looks like mush.

To save this quilt this called for a new technique... for me anyway. I got out my Prismacolor colored pencils and started shading the edges of the quilted leaves and stems....what a difference it has made.  I blended them with my finger and an eraser.
I used several shades of green and yellow plus a little red on the darker edge of the leaves and stems. They don't pop off the quilt but you can see them - kind of shadow like.

Since this quilt will not ever be washed I am not going to worry about setting the pencils with some kind of medium. Don't have anything on hand that would work anyway.
I really like the way it turned out.  Now I can see the quilted vine and leaves and the shading is just the right amount to make them show up.  Think I will try them on the flowers a bit too and maybe I can get that purple one to show up more. 

Happy Quilting,
Lynn

Monday, October 11, 2010

Machine Quilting Away

As you can see this is taking me a long time to finish.  I have quilted the bubbles up to the chalked vine and leaves and now have completed one side of the vine and leaves.  Since the fused leaves were cut with the deckle rotary cutter I decided to quilt the chalked leaves kind of squiggly too.  I used the variegated green Sulky rayon thread I used on the leaves and stems in the center of the quilt.  I sure hope they show up with all those bubbles around them.  Bubbles may have not been a good choice after all.

Happy Quilting,
Lynn

Sunday, October 10, 2010

Marking the Vine

I want to quilt a vine/leaf shape on the two sides just like the fused ones on the opposite sides. Remember what the wall hanging looks like...fused vine and leaves on only two sides.
 After thinking over my options I came up with the following solution. I placed a large piece of thin paper over the fused vine and traced the shape. I darkened it with a softer lead pencil then pinned it in the position I wanted the quilted vines and leaves. I used a Hera marker to crease the lines...a Hera marker is just a piece of sharpened plastic. I you don't have one a dull table knife might do the same thing.
The Hera marker left creases were the design was. I then took a chalk marker and darkened the lines.  One thing I didn't mention above is that I had problems keeping a perfectly parallel second line with the Hera marker. I marked 1/2" dots with the chalk pencil using my ruler then connected them to mark the second line of the vine.
Here it is all ready to stitch. Notice I have the bubbles stitched up to the fused vine already.
Happy Quilting,
Lynn

Friday, October 8, 2010

Tiny Bubbles

This "Little Autumn Mums" quilt I am making from the Frieda Anderson class I took at QuiltNebraska last summer is already pretty stiff due to the fact that every fabric has fusible behind it.  With all the close quilting I am doing it is even more stiff but I do like the results so far.  I may look a little mish-mashy with all the close quilting though.

The outside border area is where I am working now.  Decided to quilt small irregularly sized circles with the YLI Varriations thread.  If you look close you can see my circles are not perfect but when you get so many of them it disguises the imperfect ones.  This quilting design is taking a while but I do like the way it looks right now anyway.

Have a good Day!
Lynn

Tuesday, October 5, 2010

Stipple Quilting

I decided to stipple quilt the inch borders that surround the mum blocks.  I am using the same gold YLI Varriations thread.  I am really loving using this thread.  It quilts so smoothly and I really like the shine.  Have one corner left to stipple then it is on to the outside borders.

Monday, October 4, 2010

More Machine Quilting

I finally got the machine quilting done on the backgrounds of last two mums.  I do like the triangle quilting on the teal flower background but not sure about the purple one.  It almost seems too busy but don't think I will rip it out though. 

I am thinking of doing something to the purple flower to make it stand out and probably the others too.  It blends into the background too much.  Any ideas?  Have thought of crayons, paint sticks, colored pencils but don't know what to try.  I should have considered it before it was fused down and changed it then but didn't.  I had orange and yellow fabric I could have made the flowers from and one of those might have been a better choice.

Well, it is the way it is and now I need to fix it so please give me some ideas.

Lynn

Wednesday, September 29, 2010

More Machine Quilting


I quilted the stems an leaves with the variegated green rayon thread. Like it too and am not worrying about the raw edges. Stitch by stitch I am getting it quilted.

My time is short due to PT, babysitting my grandsons and harvest.  I am not driving the tractor/grain cart yet but do have to fix food for the guys in the field.  They work late late so need to have something to eat in the evening.  Sometimes they work until 10:00 pm.

Monday, September 27, 2010

Little Autumn Mums

Started quilting on the Little Autumn Mums quilt. I am taking it slow and really enjoying the process. Most times I am in such a hurry to quilt something to see how it is going to look. I get tired and sometimes hurry a quilting design. This time I have not had large blocks of time so quilt a little when I have a chance.

I I used the Rayon thread on the flower petals and the centers of the three mums. I did have to lower the tension quite a bit on the top Rayon thread and tightened the bobbin thread a little too. I am using Bottom Line for the bottom thread on this quilt. I used a topsitich needle and it all seemed to work fine. Really like the shine the thread has. Now to think of what I want to quilt on the other areas of the quilt.

Stay tuned for more quilting.
Lynn

Thursday, September 23, 2010

Quilting Threads and Backing

I purchased threads for quilting the Autumn Mums quilt (Frieda Anderson class) the other day.  I also bought a lime green backing fabric.  The fabric is sorta splotchy and think it will work out for the backing for this quilt.  It is not hand dyed like the fabrics on front but less expensive than hand dyes. 

I did select Rayon threads for my quilting threads as I wanted a shiny look.  Hope they hold up - I have heard that Rayon can by less strong as other threads but this quilt is not going to be an heirloom anyway.  Anyone with any experience using Rayon threads to quilt with?  Will let you know how it works out for me.

Happy Quilting,
Lynn 

Tuesday, September 21, 2010

Woops...I spotted a Goof!

As I was getting my Frieda Anderson quilt ready to quilt I found a big mistake that I made when making it.  Can you see it?
Look closely at the borders...do you see it now? In class we cut the border strips and fused them to the body of the quilt and I didn't even see that I made that mistake. It is supposed to have short borders on the sides and longer borders on the ends.

As you can see, I fused the left side cut the ends off then fused the top and bottom borders and the right side last.  I never saw the goof until it was too late to do anything about it.

There are no seams to rip as it is all fused plus it is fused to the batting. Frieda's method is to fuse everything which was fun but maybe if it was a stitched piece I could fix it...oh well, I still like it.

I think it is so funny that you can be looking at something for days and not see the mistake. The brain makes us see what we want to see I guess. Of course now that is all I can see when I look at it.

Happy Quilting and keep your eyes open!
Lynn

Saturday, September 18, 2010

Frieda Anderson Project

This week I worked on the class project from the Frieda Anderson workshop I took at the Nebraska State Quilt Convention. The Quilt is called Small Autumn Mums. This really was a fun project as Freida's technique is to fuse all the fabric and most of it is cut free form with the rotary cutter without the aid of a ruler.

It really is hard to just cut Frieda's beautiful hand dyed fabric this way after so many years of cutting with rulers but actually was quite freeing. I tend to be a perfectionist about accuracy and so this was way away from "normal" for me.

The background was fused together first on the large pieces of paper we peeled off the back of our fused fabric. Everything was built up and fused as we went...worked really well.

It is ready to machine quilt now and I am not sure how I want to quilt it or what threads I want to use yet. I did get some fabric yesterday to use for the backing. I didn't have any of Frieda's fabric for backing so this is just a piece of commercially mfg. fabric.

It sure is cold here this morning...when I left the house at 7:30 am it was 61 degrees and now at 11:00 am it is 54.  I guess it is supposed to be colder yet today so must be fall.  Yesterday was beautiful with temps in the mid 80s.

Lynn

LinkWithin

Related Posts Plugin for WordPress, Blogger...