This week I finished making another 21 luggage tag for my project to get 300 done for my friend. Think I am up to around 160 and am really tired of making them so decided to stop for a while. I have quilt guild friends that are making some too and will wait and see what come in from them before I cut and stitch more tags.
After making as many as I have I can almost make them in my sleep. It is much easier to make them in batches too. Saves wasted motion to cut a bunch, stitch a bunch, turn a bunch, press a bunch and stitch on the plastic in a bunch.
Happy Easter to Christians around the world. We will be going to our son in law's parent's home on Sunday noon - they don't live too far away. Can't get too far away from home for too long a time, even on Easter, as the cows don't care when they have their calves and we need to check on them pretty often in case one is in trouble and needs some help. We had church early then a pot luck breakfast after church so we will be well fed today for sure!
Lynn
Showing posts with label luggage tag. Show all posts
Sunday, April 4, 2010
Friday, March 26, 2010
Yippee - 56 Finished Today

I totally amazed myself yesterday getting all 56 tags finished that I had prepared the day before. (Reported that I had 58 but I mis-counted and there were only 56.) After stitching so many they seem to go quicker all the time. I again stitched them all up then took them to the family room and put in a movie while I turned them all right side out.
I guess I was too fast or there were not enough of them as I got done before the movie was half over. I did pause the movie and went and pressed part of them, rewarded myself and went back to watch more of the move, back and forth until they were all ready for the plastic to be stitched on.
The walking foot does help a lot but I have still had to use the paper most of the time for the presser foot to run across. Think the sewing machine gets warmed up and therefor the plastic gets warmed up and it wants to stick. I have been using the paper most of the time as a buffer between the plastic and the presser foot then I know I will not have problems.
Am up to 139 finished now...am so happy to have that many done. I wonder how many my guild members will do. Sure would hate to have made too many but I guess I can always use them as gifts if I end up making too many. Not sure if I will make more today or take a break from making luggage tags. I hate to get out of the groove since I am on such a roll but to be honest I am getting tired of doing the same thing all day long. I would never have been good working in a factory would I?
It was so beautiful outside yesterday I just had to get out. I walked out to see the new calves but covered my nose and mouth so I wouldn't breath in any of the dust. Didn't think my sinus doctor would like that this soon after surgery.
This calf was very curious about me standing on the other side of the fence and it's mother was close by to make sure her baby was safe. Isn't it so cute?

The calf walked closer and the mother was right beside it and soon after I took this photo she turned in front of the calf to put her body between me and the calf. Notice the matching ear tag numbers - 309. We tag the calf with the mother's number so we know which calf belongs to which mother. John always likes to tease that the number in the calf's ear is so the mother can run around looking for her "kid" by the number. The cow knows which baby is hers but we can't tell the difference, especially when all 100+ cows have had their calves so the ear tag number system is for us not her.
Here's to a brand new day!
Lynn
Thursday, March 25, 2010
Luggage Tags Ready to Stitch

A couple of my quilt guild members donated fabric to make luggage tags so got them all cut out yesterday and prepared to start sewing today. I got fabric cut for 58 more tags from what they donated. I like to cut a bunch of the rectangles, press under the one end and cut the ribbons then stack them ready to sew.
All I have to do then is pin in the ribbon, lay in the interfacing and stitch them together. I got 34 stitched, pressed and plastic sewn to them yesterday, so another batch is done. Think I am up to around 80 tags finished now.
After I stitch the tags around the first time I take them into the family room and sit in my chair to trim corners and turn them right side out. That way I can take a break from the sewing machine for a while. By the time I got the 34 done yesterday I was pooped! Don't think I will get all 58 stitched today as that is a lot to work on at one time and I still get fatigued from the surgery so have to rest once in a while.
This silly photo below is what was left of that HUGE snow drift behind my sewing room. It finished melting yesterday but look at how ugly my brick patio/sidewalk is. Think I will have to take John's power washer and give it a good clean!
Wednesday, March 24, 2010
Luggage Tag Tip

Wanted to pass on a tip that is working for me when making the fabric luggage tags. I suggested using a piece of paper or extra piece of fabric to have the foot of the machine ride on to stitch the plastic because the foot would drag the plastic and cause pleats and all kinds of mess when stitching. I just found a better way to stitch the plastic - use your walking foot.
When I tried using the walking foot today to stitch the plastic there was no dragging, etc. and it stitched the plastic down like a dream. I will put these suggestions on my tutorial but in case you never go back to re-read that blog entry I wanted you all to know about it.
That is all for now....
Lynn
Thursday, March 18, 2010
Fabric Luggage Tags
Warning....This is a very long post including lots of photos. You know photos tell a story sometimes better than words so I took lots of photos of the different steps to make this fabric luggage tag.

A friend asked me to make these tags for her - lots of tags. Well, she wants me to make 300 to be exact and that is a lot of tags. Last fall I asked if guild members would like to help with this project and several did say they would so will get some help getting them done. I have already made 52 in 3 days so they do go fast.
OK, let's get started....
* Cut 2 pieces bright fabric - 6" x 3 1/2"
* Cut 1 piece of interfacing - 5 3/4" x 3 1/4" (This can be fusible but I used an old fabric I wanted to get rid of - it will be hidden so any ugly fabric will work.)
* Cut 1 piece narrow ribbon - 11" long. It can be satin ribbon, gross grain ribbon or twill tape.
* Cut 1 piece of clear vinyl 2 3/4" x 4" (not pictured below)

Fold and press under 1/4" to the wrong side of one short end of each of the bright fabric rectangles.

Fold ribbon in half and pin the raw edges of the ribbon to the center of the right side of one of the fabric rectangles' short ends. (Not the end that you pressed the 1/4" under.)
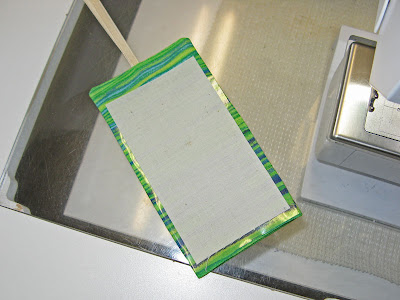
Place the piece of interfacing under the fold of the second piece of bright fabric rectangles, centering it between the sides on the wrong side of the fabric.

Place the rectangles right sides together and match up the folded edges and all the outside edges, pinning where necessary.

Stitch around the rectangle starting at the folded edges backstitching the beginning and ending, plus backstitch over the place where the ribbon is pinned to help secure it. You don't want it to pull out of the finished tag.

I like to stitch from the interfacing side so I can make sure it has not shifted out of place. Sometimes I don't even pin the layers together - only pinning the ribbon so then it is doubly important to stitch from the interfacing side. Do NOT stitch the folded ends at this time!

Grasp the folded ribbon and turn the luggage tag right side out. Use a point turner to push out the corners. Press flat.

Cutting the vinyl can be a problem - the problem being that you can't see it as soon as you lay a ruler over it. I finally figured out how I was going to deal with it and get accurate cuts. I straightened one edge then laid it along one of the lines on my cutting mat and cut a 4" width following the lines on the mat. I trimmed the end even with a line then used my ruler to slice off the 2 3/4" pieces using the lines on the mat to know where to cut. I had to slide the vinyl up to a line for each slice but at least it worked. I stacked the cut pieces alternating lengths on a piece of paper, ten to each paper so I cold keep track of how many pieces I had cut. The vinyl tends to stick together so that is why I switched the lengths back and forth so I can get hold of one when I want to use it.

Lay the vinyl rectangle over the tag with one short end even with the un-stitched end of the tag and the two long sides of the vinyl even with the long outside edges of the tag. Top stitch around the entire tag about 1/8" away from the outside edge. This will catch 3 sides of the vinyl. Do not stitch the other short end of the vinyl as you need to leave it open so the paper tag with your name and address can be inserted.
The sewing machine foot may stick to the vinyl when stitching, mine did. To solve this problem I laid a piece of fabric just inside of where you are going to stitch. (You could use a piece of paper too.) The presser foot will slide along the fabric/paper and stitch along just fine. I also run the other toe of the presser foot almost off the tag as this also helps it move along. When I ran the entire presser foot on the tag that outside toe would drag on the vinyl and make a mess so it works much better the other way.

Added information: After making more of the luggage tags I have found that using a walking foot to stitch the plastic on works so much better than the above method. The foot doesn't stick to the plastic and moves along evenly with out any paper or fabric under the toe of the foot. You will enjoy stitching the plastic on using the walking foot much better than the other method. (If your walking foot still sticks to the plastic use a piece of paper or fabric under the toe that is riding on the plastic, even if it sticks the walking foot still works better than the regular foot.)
All Done! Insert the paper tag with your name, address, etc and attach it to your suitcase, sewing machine case, computer bag, etc.
Until later,
Lynn
Subscribe to:
Posts (Atom)