Thursday, December 30, 2010

I Love To Read

School_Clip_Art_151
I wondered how many books I would read in the course of a year so decided that this year I would keep track of them on a spread sheet.  Most of the audio books were downloaded from Libravox.org a website that provides audio recordings of books in the public domain.   Over the last few years I have enjoyed listening to a wide variety of audio books from this website.  Some are the old classics, some are good and some are not so good.  I give them all a chance and usually listen to the entire book as some are just a little slow grabbing my interest and prove to be pretty good after a while or at least fill my sewing time with a story to listen to.

This list below is more for me – good to look back and see how much I did read or listen too.  Skip the list if you want as this is definitely not quilt related. 

I have starred the ones I thought were good and wouldn’t mind reading or listening to again.  I will admit I didn’t score them as I read or listened to them but if I remember enjoying them they got a star.  Guess there are a lot of mediocre books out there.  If you have any favorite books or audio books that you really liked please leave me a comment and tell me the title.  I am always looking for good references.

In Hastings there is a used book store that I frequent when I am in town.  I take books up to sell for credit and buy books there too.  I don’t get full price but it is better than nothing and with the credit I can get more books.  We have a small library in our small town but it has limited hours, no audio books and don’t seem to make it there when it is open.  My sisters like to read and I have several friends that like to read so we trade books back and forth too.  
bear-reading-transparent

Ok – here is my book list – the paper kind. Most of the time I just read a little before I go to bed so don’t get a lot read each day but feel cheated if I can not read some every night.

The D.A. Calls it Murder by Erle Stanley Gardner
A Thread of Truth by Marie Bostwick
Brat Farrar by Josephine Tey
* The Bean Trees by Barbara Kingsolver
* Pigs in Heaven by Barbara Kingsolver
* Flower Net by Lisa See
Talk Before Sleep by Elizabeth Berg
A Year of Pleasures by Elizabeth Berg
Durable Goods by Elizabeth Berg
* Twilight by Stephenie Meyer
* New Moon by Stephenie Meyer
* Eclipse by Stephenie Meyer
* Breaking Dawn by Stephenie Meyer
* Eat Pray Love by Elizabeth Gilbert
My Audiobook list of books listened to in 2010:
Captain Blood by Rafael Sabatini
The Haunted Bookshoop by Christopher Morley
The Old Man in the Corner by Baroness Emmuska Orczy
Picture Perfect by Jodi Picoult (not from LibraVox)
8 Sandpiper Way by Debbie Macomber (not from LibraVox)
* The Sea Wolf by Jack London
Esther Waters by George Moore
* The Moonstone by Wilkie Colloins
The Street of Seven Stars by Mary Roberts Rinehart
The Thirty Nine Steps by John Buchan
The Adventures of Sally by P.G. Wodenhouse
The Awakening by Kate Chopin
The Blue Envelope by Roy J. Snell
The Daffodil Mystery by Edgar Wallace
The Eight Strokes of the Clock by Maurice Leblanc
The House with the Twisting Passage by Anna Katherine Green
Initials Only by Anna Katherine Green
* Lavender and Old Lace by Myrtle Reed
* One of Ours by Willa Cather
Greenmantle by John Buchan
The Rosary by Florence Louisa Barclay
Adrift in New York by Horatio Alger

Lynn

Echo Quilting

IMG_0799
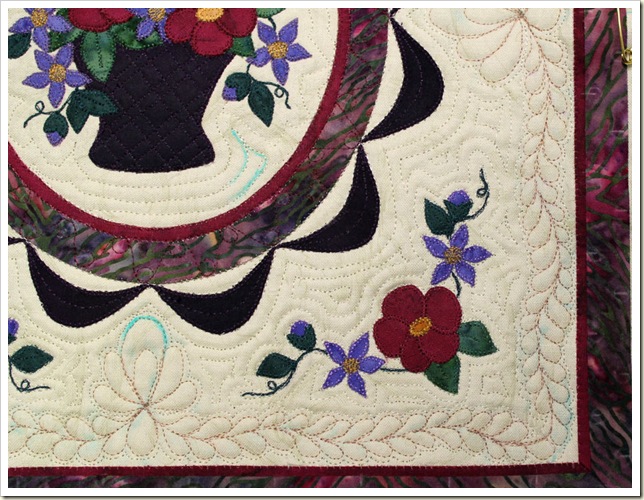
Here is what the corners look like after I echo quilted them.  Like the way it looks…..so much better than that stipple quilting.  Now on to the next borders…have them figured out so it shouldn’t take me so long to get them quilted
.
(Again remember the blue lines are temporary.)

Lynn

Wednesday, December 29, 2010

More Work on Machine Quilting

I finally decided that I just couldn't keep the machine stipple quilting I did on the miniature basketIMG_0795 quilt the other day.  The stitches ran together and looked like mush so out it came.  Using little stitches and silk thread that matches the background made it tricky to rip but with the aid of a magnifying glass I got it done.  Here is what it looked like – you agree I am sure.  Remember there is blue ink showing yet but that will all be removed when I finish the quilting.  I echo quilted around the swags and really close to the feather quilting.
IMG_0797
OK, next I decided to echo quilt around the flower motif.  I echo quilted around the swags with a larger spacing and around the feathers with a small echo so the flower echo was quilted between those two sizes.  I quilted all 4 corners then stopped and put it up to study some more before I continue.  I do like the echo quilting so much better than the stipple quilting I did earlier.  I am thinking of continuing the echoing in the rest of the spaces around the flowers.
 
See I told you I am taking my time doing this quilt but guess it is getting ridiculous with just a bit of quilting being done each day.  Oh well, the important part is that I am liking the process and don’t feel pressured to do it quickly even though I do want to get it finished by next week when I have my shoulder surgery.  If I get it done good and if I don’t that is OK too.

Maybe I can get some quilting done tomorrow afternoon.  We are supposed to get some ice and maybe snow but I have to make a trip the Hastings first thing in the morning so hope it holds off until at least tomorrow afternoon.  I can wish that we don’t get a storm but  guess you can not control Mother Nature and we take what we get.

Lynn

Monday, December 27, 2010

Nearing the End of 2010

Now that Christmas is past, our children and grandchildren have gone back to their own homes and I have taken down the Christmas decorations I had time today to work on a project or two of my own.  Normally I leave the Christmas decorations up until mid-January but since I have shoulder surgery scheduled in a week I wanted to get everything back and the decorations put away before then.  I am hoping that the surgery will not be too bad but had surgery on the left shoulder 7 years ago and it turned out worse than they thought before surgery and I had quite the recovery from it so I am not counting on simple until it is all over.

Today I first worked on doing a little more machine quilting on my basket quilt.   Not sure I like what I did so am letting it sit while I think about it.  I put it up on the flannel wall and looked at it every once in a while this afternoon...still don't know.

This evening I pulled out a beading project I had started many months ago.  It took me a while to figure out where I was on the pattern though.  This pattern is hard to follow anyway as it seems to be just a photo of a finished project instead of a graphed pattern that for me is easier to follow.  I am checking off every other row with a different symbol so I can keep track of where I am on the pattern.  I did scan the pattern photo and reverse it so it would work for me to bead it left handed.  Patterns seem to be all written for right handed people.

I am thinking I may be able to do beading after surgery even with my right arm in a sling.  I am left handed and most of my work is with my left hand.  I think the right fingers could hold the project without putting pressure on my shoulder.  Guess I will have to wait and see.

I am also preparing for not being able or wanting to do any cooking after surgery for a while.  The last several weeks when I make a food that can be frozen I have made at least a double size recipe then froze meal sized portions that would feed both John and I.

It was so nice to have the frozen entrees when I broke my ankle (our daughter, granddaughters and friends made and brought food that I portioned out and froze until needed.)  So far I have enchiladas, spaghetti sauce, steak pieces for stroganoff, chicken and noodles, chili, ham slices, ham balls, and have the ingredients to make lasagna tomorrow plus I still want to make some meat loaves too.  That should help me out for quite a while.

Think I will even do this after I am recovered as getting an entree from the freezer already made has been so handy  We didn't eat everything that was in the freezer when I was laid up with the ankle and have enjoyed having it there to use when I am busy or don't want to take the time to cook from scratch.

Oh, by the way, no one noticed I didn't put out all the Christmas decorations....am seriously considering downsizing the decorations I keep in the boxes before next year so I am not even tempted to put it all out again.  The grandkids noticed the stockings right away and had to find the one with their name.  One son in law even recognized one stocking as having been made from a pair of his old jeans....he recognized the small round hole that was in the bottom of the jeans when he wore them.

Until later,
Lynn

Friday, December 24, 2010

Hand Painted Crèche

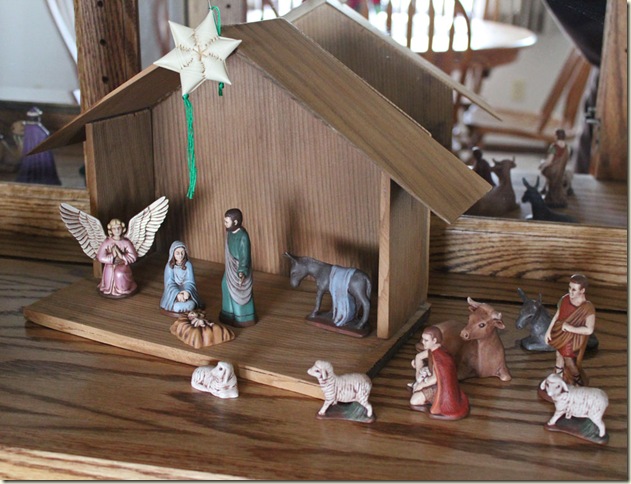
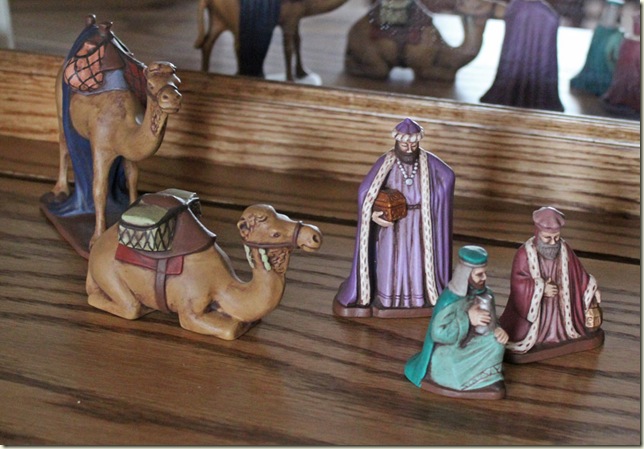
I was painting ceramics in the 80s at a local gals shop.  I painted a lot of things at that time enjoying the fun of doing a craft and visiting with other young mothers doing the same thing.  I took my daughter S along with me as she was not old enough to be in school yet and they allowed her to paint pieces too.  I wonder if she kept any of those kittens and other things she made.
IMG_0591
IMG_0592
In 1986 I made this Crèche for our home.  The standing figures are about 1 1/2” tall and  I display it in the china hutch in the dining room.  I started doing that when we moved here as the grandchildren just couldn’t leave the figures alone and after all who could blame them.  I remember rearranging the nativity figures in our Crèche when I grew up too but they were plastic and didn’t break.  The grandchildren knew that anything in the china hutch was “look only” and they could stand and look through the glass doors at all the pretty things. They are old enough now to display them other places but I like the way they look in the hutch with the mirror backing.

John made the wooden stable for the figures and the star was a gift ornament that I thought was perfect for our Crèche.  Another one of my “most favorite” Christmas decorations!

Tonight is Christmas Eve....My wish for you is to slow down your busy life and enjoy the reason for the season. 

Lynn

Thursday, December 23, 2010

Today’s Ornament

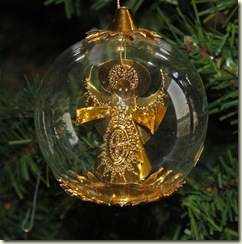
IMG_0609The ornament I am showing today is one that my in-laws gave us for our first Christmas together.  It is a clear glass ball with a gold foil angel hanging inside.  It isn’t anything expensive or maybe even remarkable but it is special because Mary and Merlin gave it to us.  It has a special place on the tree each year and has hung on a tree in our house now for 39 years.

Using Windows Live Writer again….let me know how it is showing up for you and how you like it.

Hear the carols, smell the hot chocolate, taste the goodies  and prepare your heart for Christmas.

Lynn

Wednesday, December 22, 2010

More Special Ornaments

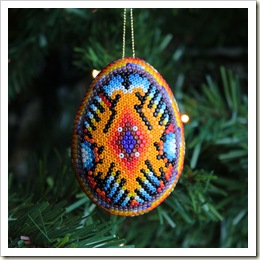
Since I have no sewing/quilting projects or progress to show you I am IMG_0526going to post 2 more of my favorite Christmas ornaments.

This is an ornament I purchased a few years ago.  It is entirely covered with seed beads that are glued to an egg shape.  As you can see the holes of the beads are faced up.  I don’t remember but am thinking this was made in a country other than the United States.  John and I had attended the National Finals rodeo in Las Vegas and I purchased this at the merchants/vendors building.  I should have written down the information at the time … oh well, I still love it and it reminds us of that trip.

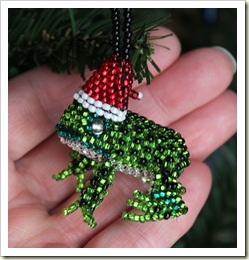
IMG_0604 While I am showing beaded  ornaments the one below was given to me by Fay this year (two beaded ornaments in one year – wow!)  This three dimensional Santa frog she didn’t make though.  She purchased it but isn’t it the cutest thing.  I had to take a photo with my  hand just to show you how small it is.

Am trying something new as I write this blog entry.  I am using Windows Live Writer.  It has a few more bells and whistles than the blogger posting page.  Let me know how it shows up or if you like or don’t like reading it this way.  I have no idea how it will publish.


Enjoy the sights and sounds of the season!
Lynn
PS - Live writer if from Windows.  You can learn more about it here and download the add on to your computer.  I have Vista on my computer.

Tuesday, December 21, 2010

Hand Made Ornaments


I love, love, love hand made ornaments and here are three I received from three dear friends this year.  We met for lunch, gabbing and gift exchange last week, a tradition we started many years ago.  We meet for each others birthdays and for QuiltNebraska, the Nebraska State Quilt Guild quilt convention each summer.  One friend has a December birthday so we combine the birthday and Christmas celebration.

This first ornament is beaded over a 1 1/4" glass Christmas ball ornament and is so small.  The beads are Delica sized seed beads done in the peyote stitch.  Fay made each of us one of these tiny exquisite ornaments with different designs.  Mine has snow men and cardinals on it - cute, cute cute!

Ornament #2 was made by my long time good friend Janet.  Actually Janet and I were in highschool and best friends many moons ago.  We stayed friends over the years but only wrote once or twice a year until we both started quilting and joined the Nebraska State Quilt guild at the beginning of the organization in the mid 80s.  (Almost giving my age away aren't I?)  We became closer and have enjoyed all the social times and quilting things we have done together over the years.  She even opened a quilt shop which is a great place to hang out.  Too bad I live about an hour and a half away.

This ornament is one of the cute kits Janet sells from her store, Quilter's Delight in Holdrege.  Different sections of the fabric are lightly colored and then the designs were all hand embroidered by Janet with a single strand of floss and are so delicate looking.
Ornament #3 is adorable and made with stacks of buttons.  Shirley gave this one to me last week and it came from a store called Ten Thousand Villages.  There is a store in Kearney and one in Lincoln and they have the most amazing merchandise.  Isn't this little man cute!

This is what it says on the website about Ten Thousand Villages -"Ten Thousand Villages is a nonprofit program of Mennonite Central Committee.  Ten Thousand Villages' mission is to create opportunities for artisans in developing countries to earn income by bringing their products and stories to our markets through long-term fair trading relationships."  (There stores in other parts of the United States too so check them out and help out a fellow artisan.)
Maybe these will give you ideas to make for next year as it is probably too late to get any of these things made this year unless you are super organized and a fast worker.
Lynn

Monday, December 20, 2010

Lighting up the Windmill

 Each year John's dad would string lights on the windmill in their farm yard and we kept up the tradition after we moved here.  I have been trying to get a good photo of the lights for several days so I could share with you how pretty they look.

The first photo is what it really looks like at night all lit up but to be honest you would not know if it were 2 feet tall or 200 feet tall.  John and I estimate it is probably 40 to 45 feet tall.
This evening I went out again before it was pitch black out and took a few more photos and changed the settings on the camera so you could see the rest of the farm buildings to give you some perspective on size.  It made the lights a little fuzzy but you can see it in comparison to the other buildings.  Our house has the two larger lights clear to the right of the windmill near the edge of the photo.

This windmill does not have the blades on it but still has the tail blade that catches the wind to position the wheel to catch the wind.  You can see the reflection of the lights from the star on it above the star.  If you look closely you can see the silhouettes of the calves.  They are in a pen across the driveway from the windmill.
This windmill is not functional anymore although we do have our water well under the windmill but it is pumped out of the ground by an electrical pump.  Someday John and I would like to put the blades back on the windmill to make it look like it used to.  The blades were saved and are behind the barn so we know where they are.  It is just a matter of figuring out how to get them up the tower and attached again.  We might have to get someone to come out with a boom to help.  Will let you know when/if that ever happens.

In the mean time we put the lights up and enjoy them.  People that the frequent the highway past our house always comment about the windmill lights, especially if John doesn't get them up the first week of December.  You can see them from several miles in each direction.   John does extend out the base of the windmill with some boards so the strings of lights will not hit the metal supports and break the bulbs when the wind blows - that is why  it is wider than normal.  The windmill has 4 legs and he has 8 strings of lights coming down from the star.

Enjoy our lights and the ones in your own communities....they do look so magical this time of year. 

Lynn

Favorite Ornaments

One of the things I enjoy about decorating the Christmas trees is unwrapping and hanging each of the ornaments.  A lot bring back memories of past Christmases.  Some were made by special people, some were purchased and bring back memories of the time when they were new.

 In 1982 I made ornaments like the one above for all our extended families plus all the Sunday School kids I had in my class at the time.  I made the salt-flour dough and spelled out the names then added the heads to each - I painted them after baking in the oven.  This one is the one I made for our family.  John with his brown hair, me with my red hair (it has faded to something that doesn't even resemble red now and John's has turned to silver), daughter A with her blond hair and daughter S with her brown hair.  I wrap this ornament very carefully each year so it won't break.
 When our daughters were very young we made ornaments like this from the cardboard egg cartons to give to everyone.  We glued two parts together, spray painted them gold, glued on trim and sequins and hung a small gold glass ball in the center.  It isn't the prettiest but I love it and will hang it on the tree every year.  The girls had so much fun making them and thought they were so pretty with the sequins they glued on.
This is a very special ornament to me.  The very first year we were married (1971) we didn't have anything to decorate the tree with so I ordered this ornament from Good Housekeeping magazine.  I think I spent a couple of dollars for it at the time which I thought was pretty expensive but wanted a special 1st ornament for us to commemorate the year we were married.  It was made in West Germany and is made from the curls of shaved wood and a bead to indicate Baby Jesus head.  It has it's own special box where it is stored with the words West Germany stamped on it.

Memories....wonderful memories!

Lynn

Sunday, December 19, 2010

And The Stockings Were Hung

The 10 denim stockings are now hung on our fireplace mantle.  This photo was taken before I filled them and now they are fat and ready for everyone to empty when we open gifts this week.  We will be celebrating before Christmas with our daughters and their families.  They will be leaving for their own homes on Christmas Eve.  So far we have managed to not tell them I made the stockings....I wanted to keep it as a surprise. 

The mantle is holding a few of of my Santa collection.  Most of them have been gifts so I treasure them all.

Lynn 

Saturday, December 18, 2010

Busy December

Molded Glass
I don't know where most of December went but here it is a week before Christmas and I haven't posted since December 1. I have not touched my sewing machine since then either.
Painted Canvas and Metal

Two weeks in a row John and I attended conferences in Kearney for several days each. I did get most of my Christmas shopping done while John attended meetings but sure didn't get anything done here at home.  I have made some candies and cookies, made some Christmas visits, wrote our Christmas letter, cleaned up my house and have my laundry caught up so now I have time to do a few other things before our family arrives mid-week.
Molded Glass
This year it took me longer to get my decorations up - walking is still not back to normal so my ankle gets tired easily. I decided to not take everything out of my boxes this year but the house looks festive anyway. I have WAY TOO MANY Christmas decorations and should sort and get rid of some of them. Maybe my daughters will want some that I didn't put up then I wouldn't feel bad about leaving them in the box.
Painted Gourd
We put up two trees....I know it's overkill. One of them is very skinny, called a pencil tree that we have had for years. The house we moved from was limited on space so we got this skinny tree and it worked out great. We have two living areas so one tree is put up in each. The skinny tree only has Santa ornaments on it...with the exception of one Mrs. Santa.
Plastic from the 80s
Santa and Mrs. Santa I made from nylon hose
The second tree is full and tall and I put the rest of the ornaments on it - oh, by the way both trees artificial. I am allergic to pine, cedar and fur trees so just can't have them in the house and the artificial look OK.
Santa holding a quilt
Plastic formed over glass ball
The photos on this post are some of the Santa ornaments on our skinny tree. Enjoy!

Lynn

Wednesday, December 1, 2010

My Nest

I have taken lots of photos here around the house to learn what my camera can do, how to change the settings and practice taking photos.  I took a photo of "my nest" as one of those photos.
As you can see I have a lot of stuff surrounding the chair I sit in to watch TV, do needlework and play on the computer.  I used Photoshop Elements to draw the different colored arrows to the different things.

First my lovely almost worn out blue recliner.  We have had it for years and the fabric is starting to wear out but I have not found anything to replace it with that is as comfortable.  I have an end table to the left of the chair with quilt magazines and a lamp and telephone but wanted more table space so have a small folding table to the right.  I can take it down when we have company or use it in other places in the house when I need an extra table.  It can be set up at different heights too which is nice (Purchased it at Menards a few years ago)

OK...now on to the rest of the stuff.  The yellow arrows point to my lap top computer and charger cord.  The laptop is sitting on a sort of bean bag with a flat surface on the top of it.  It is something that the girls had when they were young so they could lay on the floor and color or do homework.  Kind of like a little table top.  It works great to sit on my lap to use the laptop.

The green arrow points to a fabric bag filled with rice that I used on my ankle the other day.  I keep it in the freezer and when I need an ice bag I use that.  It is not quite as cold as real ice but is cold enough for most times that I need one.

The orange arrow points to a can of my various remotes.  Seems like there is one for everything...TV, VCR, DVD, Stereo and Satellite.  They get scattered all over so now I have this can/small bucket that I keep them in.

Pink arrow points to the fly swatter.  Yes it is December 1 but just last week I had a fly annoying me while I sat in the chair.  He didn't annoy me long though!

Lastly are the blue arrows.  The blue arrows point to the stuff I use to exercise my ankle.  On the left side of the photo is a tan belt - used to wrap around foot and stretch foot side to side, pull up foot and twist foot.  The red stretchy rubber band like thing has a loop tied in the end where I insert my foot.  I have to pivot my foot all different directions with it being stretched for resistance.  There is a tennis ball and another prikly blue ball that I have to roll the ball of my foot over.  (prickly ball is sold to use in the clothes dryer)  Lastly is the dictionary on the floor and the mayo jar wrapped in hand weights on the table.  Odd things to use for therapy but this is how I use them.  I put the ball of my foot on the dictionary and the mayo jar wrapped in hand weights on my knee.  The theory is the weight will help stretch my foot and ankle muscles so I can eventually get my heel to touch the floor and the mayo jar was the heaviest thing I could find in my cupboard.

I finished my last physical therapy session on my ankle yesterday but will keep doing the exercises at home for many months yet I am sure.  The pain is gone but it is still stiffer than I want it to be.  I have to remember not to limp and to walk slowly stretching the ankle each time I take a step.  Hopefully someday I won't even notice the difference between the two ankles.

I have not told you that I do have to have surgery on my right shoulder the first part of January so will start  PT with that a few weeks after.  The shoulder has a flex. joint called the AC joint at the end of my collar bone that is very arthritic.  The arthritis has grown downward and that is scraping one of my rotator cuff muscles.  So far it has not done too much damage but could if left alone.  I had the same problem with my left shoulder and had surgery on it 7 years ago and had let it get really bad and had to have more done but it is great now.  I decided to have the surgery right after Christmas so I could be healed by spring then I can do my own gardening this year.  It is not something I am looking forward to but it is not going to get better and only worse if I do nothing.  I am tired of it hurting and my motion being limited on that arm.  Actually I was seeing the Dr. for the shoulder and doing PT for it when I broke my ankle so it has been put on hold until the ankle got well.  I am hoping this next year I have no surgeries or major health problems because this year has been a bummer.

I am left handed so hopefully this time I will be able to manage things a little better than when I had it operated on.  It still is very hard to do some things with only one arm.  Try zipping up your jeans, drying your hair with the blow dryer, putting on your bra with only one hand.  I am so thankful that John can help me with some things, some I will forgo like the bra (thankfully it will be cold so I can wear heavy sweatshirts and no one will even know) and will probably just wear sweat pants until I can manage to button and zip my jeans.  As for the hair, last time I had John hang an wire clothes hanger over the curtain rod and tied my blow dryer to it.  I could style my hair as it dried that way.  You know a person always finds a way to do things if possible.

I don't know how much sewing, even by hand, I will be able to do though.  I am hoping I can do some or maybe do some beading to keep busy.  Will let you know.

OK - guess I have delayed getting my Christmas decorations up long enough.  I have the boxes up from the storage room in the basement and need to get it done today.  It always looks so nice when it is finished.  Will get a photo of the stockings when I get them all hung too.

Lynn

Tuesday, November 30, 2010

UPS Package Has Arrived

I certainly hope I get more done the rest of the week than I did on Monday. The UPS truck came and left a package...something I have been waiting for 10 days to arrive.
I have wanted a DSLR (digital single lens reflex) camera for sometime and have been studying reviews and watching prices for the optimum time to purchase it. I settled on the Canon EOS Rebel T2i and it arrived yesterday on a cold, windy freezing misty day.

I should have let the box just sit on the counter until evening before opening it, then I might have gotten a little sewing done or hauled my Christmas decorations out of the basement and started decorating the house. Instead I started reading the instruction manual, and another book "Canon EOS Rebel T2i/550D Gude to Digital SLR Photography" by David Busch that I also purchased. I have taken photos of my feet, the office, etc. to practice what I am learning and obviously not saving any of them.  It will take a while to remember what all the buttons, dials and digital readouts mean and what they do.  It is amazing how much there is to learn!

So far I am having fun and snapping photos, changing settings and snapping some more. Not sure when I will be ready to use it to take photos to post here though. 

I used a 35mm film camera for years and have missed all the advantages of a single lens reflex camera since I have been using digital cameras so hope I can learn to use and enjoy this camera as much as that one.  I plan to keep the camera I am/was currently using as it still works.  I never know when I may want to use it again or let the grandchildren use it when they visit.

Back to reading and snapping more photos.

Lynn

Monday, November 29, 2010

More Stockings to Show

 A friend of mine cut out stocking shapes from the old denim jeans and had them ready for her family when they came to her home for their Thanksgiving together.  Their family has a tradition of making some craft when they gather.  This year she had the shapes cut and had gathered all kinds of trims, buttons, appliques, lace etc. for them to use.  The kids are all teenagers and still love to make things at their grandparents home.  What a great tradition!


My friend M. had them use a hot glue gun to attach the decorations and then stitched the stocking front and back together on the machine. She had them fuse the toe and heel pieces onto the stockings just like I did though.  I love the way some of them used fabric through the belt loops.  She did mention that if they were to do it again she would stitch the two layers together before they decorated them as she thought it would work better.   

Doesn't that look like a fun family activity?

Until Later,
Lynn


Update: Here are the links to all the stocking blog posts.
Part 1 Christmas Stocking Fun
Part 2 Christmas Stocking Fun Part 2
Part 3 Christmas Stocking Tips
Part 4 Denim Jeans Christmas Stockings
Part 5 More Stocking Hints And Observations
Part 6 Two More Christmas Stockings
Part 7 Hanging The Stockings
Part 8 More Stockings To Show
Part 9 Another Jeans Stocking For The Fireplace
Part 10 Pattern

Sunday, November 28, 2010

Hanging the Stockings

We have a wooden mantle but I didn't want to put any nails in it to hang the stockings.  I purchased these 3M hangers that stick onto the wood and when you want to remove them there is a way to stretch the sticky stuff to release it.  Should not make any marks on the mantle.

I know you can purchase these heavy stocking holders but didn't want to spend that much plus I didn't want to take up the entire top of the mantle with 10 of these holders.

 Here is what it looks without the stocking hanging on it and the next photo shows my stocking hanging.  The 3M hangers are rated for holding up to 3 pounds so will need to make sure I don't get too heavy of stuff in them.

Later - Lynn
Update: Here are the links to all the stocking blog posts.
Part 1 Christmas Stocking Fun
Part 2 Christmas Stocking Fun Part 2
Part 3 Christmas Stocking Tips
Part 4 Denim Jeans Christmas Stockings
Part 5 More Stocking Hints And Observations
Part 6 Two More Christmas Stockings
Part 7 Hanging The Stockings
Part 8 More Stockings To Show
Part 9 Another Jeans Stocking For The Fireplace
Part 10 Pattern

Saturday, November 27, 2010

Two More Christmas Stockings

 While I had the mess of working with the blue jeans I decided to make two more.  These will be used as Christmas gifts for our saddle club party.  I will get a package of mini candy bars to stuff into the stocking and maybe use tissue in the top to hold it in.  Instead of using Christmas fabric I used fabric I had on hand that had images of horses for the toes and heels.

 I think these are my favorite stockings - the variegated rayon thread really is so pretty and the stitches show up pretty good on these two.  I tried, and almost got the horses running level which was a real challenge.

Until Later,
Lynn  

Update: Here are the links to all the stocking blog posts.
Part 1 Christmas Stocking Fun
Part 2 Christmas Stocking Fun Part 2
Part 3 Christmas Stocking Tips
Part 4 Denim Jeans Christmas Stockings
Part 5 More Stocking Hints And Observations
Part 6 Two More Christmas Stockings
Part 7 Hanging The Stockings
Part 8 More Stockings To Show
Part 9 Another Jeans Stocking For The Fireplace
Part 10 Pattern

Friday, November 26, 2010

More Stocking Tips, Hints and Observations


Only read this on the original blog post as it has been pirated.  You will find a link on the right sidebar of my blog  http://nebraskaviews.blogspot.com 
 
Thought I would share photos and clarify a few things I told you about in previous blog entries.    A few of the stocking fronts were kind of wavy on the heel as I had cut them from the back seam of the jeans and either the fabric isn't flat when I cut it or because of all the bias I ended up with a stocking that wouldn't lay flat.

OK, look at the first photo and you can see the extra fabric.  Since this area will be covered with the fused heel piece I just pressed the excess fabric into a fold.  The fused heel will cover it and you don't even know it is there and your stocking lays flat.
The hanger for the stocking is cut from the flat feld seam.  Some may not know what or where to find that kind of seam on a pair of jeans.  The yellow arrow points to a flat feld seam and this seam is usually on the outside of the legs.  This is a bottom leg of the jeans that I had cut a stocking back from.  Cut closely on both sides of the seam and use this strip for the loop hanger for the stocking.  The seam is very thick and sturdy.


I stitched the loop onto the back before I joined the back to the front.  I placed it about 1/2" away from the edge to allow the seam to be stitched without having to stitch through the loop when putting them together.  I did stitch over the ends 4 to 6 times to make sure it would not come loose.

The loop is stitched on side that is above the heel of the stocking.  Let me think, what else....Oh I cut the strips for my stockings 10" long but cut them what ever length you want for your stocking.
I did share that you want to avoid the rivets, and heavy seams or belt loops on the edges where you will be stitching.  On one stocking I had cut it with the loop right on the edge so I just stitched to the inside of the loop then back out to the normal seam allowance.

I used the zipper area in two stockings.  One stocking only had part of the zipper so I just cut the zipper teeth off and it stitched up just fine.  The one where I used the entire zipper in it was a little trickier to stitch the seam.  I had to use my zipper foot to stitch close even though I had left a 1/4" seam allowance it wasn't quite enough seam allowance on the outside of the zipper.  The seams at the bottom of a zipper are tough to pierce with a needle too and I did break a needle on the tough seam in that area.

One thing that happens to jeans that have been washed and dried many, many times is that the fabric in the seam allowances gets very stiff and tough.  I ran into those types of seams on several of the stockings but stitched slowly and used the titanium Superior topstitch needle size 90 but a size 100 would have been better.

Maybe you noticed the patched area on one stocking.  I decided that it added a little more interest and didn't even try to cover it up or avoid it.

The names were drawn onto the stocking - learned that worked better than just free handing the name like I did with the first stocking.  John's stocking was my prototype and I had trouble keeping the name straight and the letters even sized.

I  chalked lines on the stockings after that and drew the letters on these registration lines.  It was so much easier to get it all even and was easier to stitch since I could see where I was going next.  I dropped the feed dogs on my machine and used the open toed embroidery foot and set the zig-zag stitch to a width of 2.8.  I went slow and sometimes would go back over the stitching to make it dense enough to show up.


My Bernina has a buttonhole stitch that goes back and forth to make a heavier looking stitch.  I really think the thread shows up more with this stitch than the single buttonhole stitch.  It is stitch 1330 on my 730 Bernina.  The width was set to 5 and the lentgh set to 4.

I touched on thread color before but can not stress how important it is that the thread shows up on the denim.  The jeans I used were a middle value of blue and some thread did not show up well at all.  The green thread is one that I used and basically the stitches really disappear because they are the same value as the blue jeans.  I did find that if I could find a stitch that was more dense it helped those threads but still not the best choice.  You notice I didn't dislike it enough to rip it out though!

One last tip...if you click on one of the photos and it still isn't big enough to see what you want you can try this trick.  This works on PCs but don't know about MACs.  Click on the photo and open it in a new window then hold down the "ctrl" and roll the scroll wheel on your mouse.  If you roll the wheel one way it will make it larger and the other way it will make it smaller.  You can make the printing on most web pages larger or smaller this way too.  To get it back to where it was before just scroll the opposite way.

Did I leave anything out or anything that is unclear on the making of these stockings?  Let me know if you have any questions and I will try to answer them.

Lynn

Update: Here are the links to all the stocking blog posts.
Part 1 Christmas Stocking Fun
Part 2 Christmas Stocking Fun Part 2
Part 3 Christmas Stocking Tips
Part 4 Denim Jeans Christmas Stockings
Part 5 More Stocking Hints And Observations
Part 6 Two More Christmas Stockings
Part 7 Hanging The Stockings
Part 8 More Stockings To Show
Part 9 Another Jeans Stocking For The Fireplace
Part 10 Pattern

LinkWithin

Related Posts Plugin for WordPress, Blogger...